Monitoring Airbyte
Airbyte offers you various ways to monitor your ELT pipelines. These options range from using open-source tools to integrating with enterprise-grade SaaS platforms.
Here's a quick overview:
- Connection Logging: All Airbyte instances provide extensive logs for each connector, giving detailed reports on the data synchronization process. This is available across all Airbyte offerings.
- Airbyte Datadog Integration: Airbyte customers can leverage our integration with Datadog. This lets you monitor and analyze your data pipelines right within your Datadog dashboards at no additional cost.
- Airbyte OpenTelemetry (OTEL) Integration: Coming soon, this will allow you to push metrics to your self-hosted monitoring solution using OpenTelemetry.
Please browse the sections below for more details on each option and how to set it up.
Airbyte Datadog Integration
Monitoring your Airbyte instance using Datadog is an early preview feature and still in development. Expect changes to this feature and the configuration to happen in the future. This feature will be only for Airbyte Enterprise customers in the future.
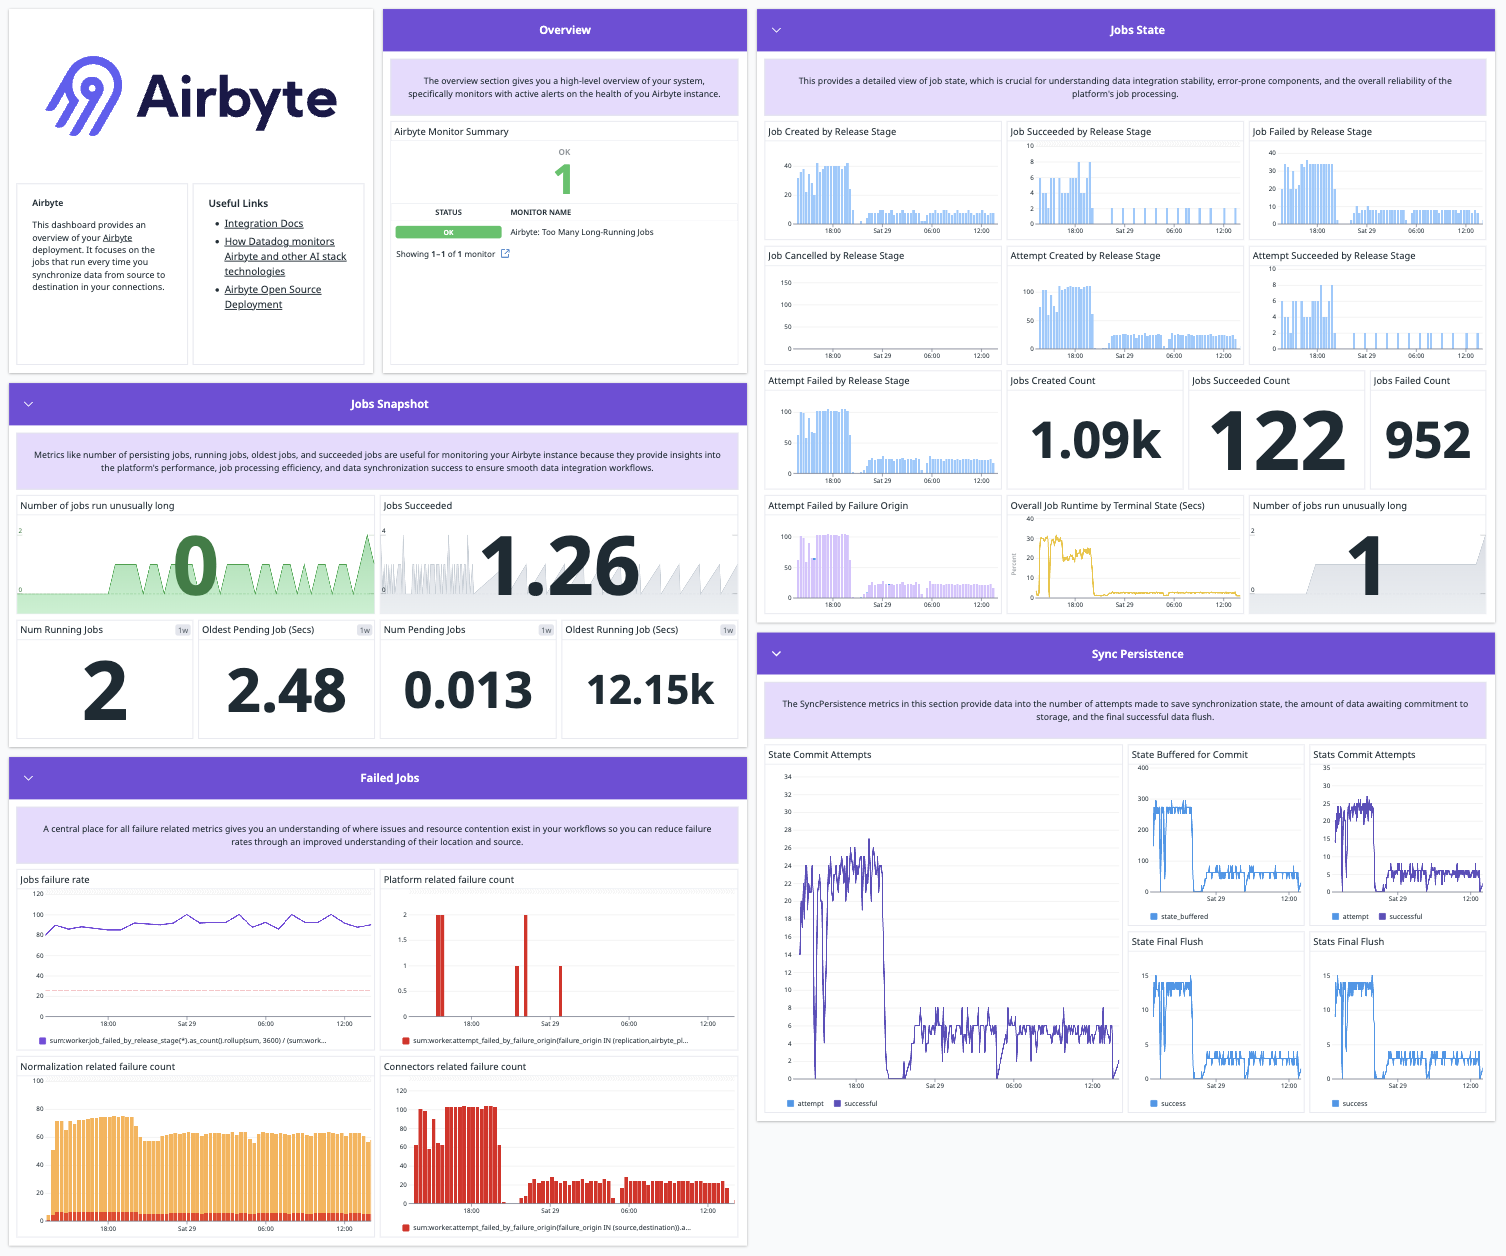
Airbyte's new integration with Datadog brings the convenience of monitoring and analyzing your Airbyte data pipelines directly within your Datadog dashboards.
This integration brings forth new airbyte.* metrics along with new dashboards. The list of metrics is found here.
Setup Instructions
Setting up this integration for Airbyte instances deployed with Docker involves five straightforward steps:
- Set Datadog Airbyte Config: Create or configure the
datadog.yamlfile with the contents below:
dogstatsd_mapper_profiles:
  - name: airbyte_worker
    prefix: "worker."
    mappings:
      - match: "worker.temporal_workflow_*"
        name: "airbyte.worker.temporal_workflow.$1"
      - match: "worker.worker_*"
        name: "airbyte.worker.$1"
      - match: "worker.state_commit_*"
        name: "airbyte.worker.state_commit.$1"
      - match: "worker.job_*"
        name: "airbyte.worker.job.$1"
      - match: "worker.attempt_*"
        name: "airbyte.worker.attempt.$1"
      - match: "worker.activity_*"
        name: "airbyte.worker.activity.$1"
      - match: "worker.*"
        name: "airbyte.worker.$1"
  - name: airbyte_cron
    prefix: "cron."
    mappings:
      - match: "cron.cron_jobs_run"
        name: "airbyte.cron.jobs_run"
      - match: "cron.*"
        name: "airbyte.cron.$1"
  - name: airbyte_metrics_reporter
    prefix: "metrics-reporter."
    mappings:
      - match: "metrics-reporter.*"
        name: "airbyte.metrics_reporter.$1"
  - name: airbyte_orchestrator
    prefix: "orchestrator."
    mappings:
      - match: "orchestrator.*"
        name: "airbyte.orchestrator.$1"
  - name: airbyte_server
    prefix: "server."
    mappings:
      - match: "server.*"
        name: "airbyte.server.$1"
  - name: airbyte_general
    prefix: "airbyte."
    mappings:
      - match: "airbyte.worker.temporal_workflow_*"
        name: "airbyte.worker.temporal_workflow.$1"
      - match: "airbyte.worker.worker_*"
        name: "airbyte.worker.$1"
      - match: "airbyte.worker.state_commit_*"
        name: "airbyte.worker.state_commit.$1"
      - match: "airbyte.worker.job_*"
        name: "airbyte.worker.job.$1"
      - match: "airbyte.worker.attempt_*"
        name: "airbyte.worker.attempt.$1"
      - match: "airbyte.worker.activity_*"
        name: "airbyte.worker.activity.$1"
      - match: "airbyte.cron.cron_jobs_run"
        name: "airbyte.cron.jobs_run"
- Add Datadog Agent and Mount Config: If the Datadog Agent is not yet deployed to your instances running Airbyte, you can modify the provided
docker-compose.yamlfile in the Airbyte repository to include the Datadog Agent. For the Datadog agent to submit metrics, you will need to add an API key. Then, be sure to properly mount yourdatadog.yamlfile as a Docker volume:
  dd-agent:
    container_name: dd-agent
    image: gcr.io/datadoghq/agent:7
    pid: host
    environment:
      - DD_API_KEY={REPLACE-WITH-DATADOG-API-KEY}
      - DD_SITE=datadoghq.com
      - DD_HOSTNAME={REPLACE-WITH-DATADOG-HOSTNAME}
      - DD_DOGSTATSD_NON_LOCAL_TRAFFIC=true
    volumes:
      - /var/run/docker.sock:/var/run/docker.sock
      - /proc/:/host/proc/:ro
      - /sys/fs/cgroup:/host/sys/fs/cgroup:ro
      - {REPLACE-WITH-PATH-TO}/datadog.yaml:/etc/datadog-agent/datadog.yaml
    networks:
      - airbyte_internal
- Update Docker Compose Configuration: Modify your
docker-compose.yamlfile in the Airbyte repository to include themetrics-reportercontainer. This submits Airbyte metrics to the Datadog Agent:
  metric-reporter:
    image: airbyte/metrics-reporter:${VERSION}
    container_name: metric-reporter
    networks:
      - airbyte_internal
    environment:
      - DATABASE_PASSWORD=${DATABASE_PASSWORD}
      - DATABASE_URL=${DATABASE_URL}
      - DATABASE_USER=${DATABASE_USER}
      - DD_AGENT_HOST=${DD_AGENT_HOST}
      - DD_DOGSTATSD_PORT=${DD_DOGSTATSD_PORT}
      - METRIC_CLIENT=${METRIC_CLIENT}
      - PUBLISH_METRICS=${PUBLISH_METRICS}
- Set Environment Variables: Amend your
.envfile with the correct values needed bydocker-compose.yaml:
PUBLISH_METRICS=true
METRIC_CLIENT=datadog
DD_AGENT_HOST=dd-agent
DD_DOGSTATSD_PORT=8125
- Re-deploy Airbyte and the Datadog Agent: With the updated configurations, you're ready to deploy your Airbyte application by running
docker compose up.